
we've come from the previous page here…
Installing Client tools | Linux Client integration pack
According to the GitHub source it says that the repo contains the equivalent of EVE-NG windows Client-side pack for Ubuntu/Debian and other Linux distros.
Currently supports the following URL schemes:
					telnet://
capture://
docker://
vnc://
Installing eve-ng-integration from the official PPA
					sudo add-apt-repository ppa:smartfinn/eve-ng-integration
sudo apt-get update
sudo apt-get install eve-ng-integration
or download .deb packages from here
Manual install
Clone this repo
git clone https://github.com/SmartFinn/eve-ng-integration.git
or download and extract the tarball
					wget -O eve-ng-integration.tar.gz https://github.com/SmartFinn/eve-ng-integration/archive/master.tar.gz
tar -xzvf eve-ng-integration.tar.gz
Run make install as root
					cd eve-ng-integration/eve-ng-integration-master
sudo make install
Install dependencies
- python >= 2.7 (required)
- telnet (required)
- Wireshark (recommended)
- ssh-askpass (recommended)
- vinagre (recommended)
- docker-engine (optional)
Updating EVE-NG machine
Check the Openssh server on the EVE-NG machine whether it is activated or not?
					Dpkg -l | grep openssh
Systemctl status openssh
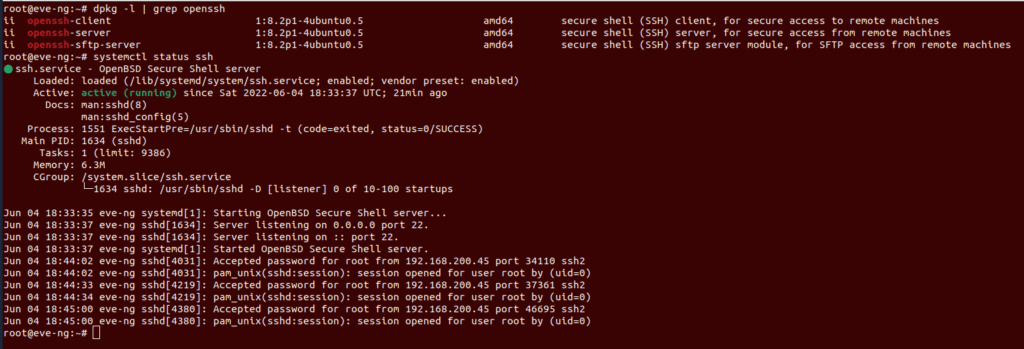
Coupled with the fact that firewall is up and running by default so let’s see is there any rule for ssh?
Ufw allow ssh
Connect to the EVE-NG machine and upgrade it.
            Ssh root@192.168.200.43
Apt update
Apt upgrade
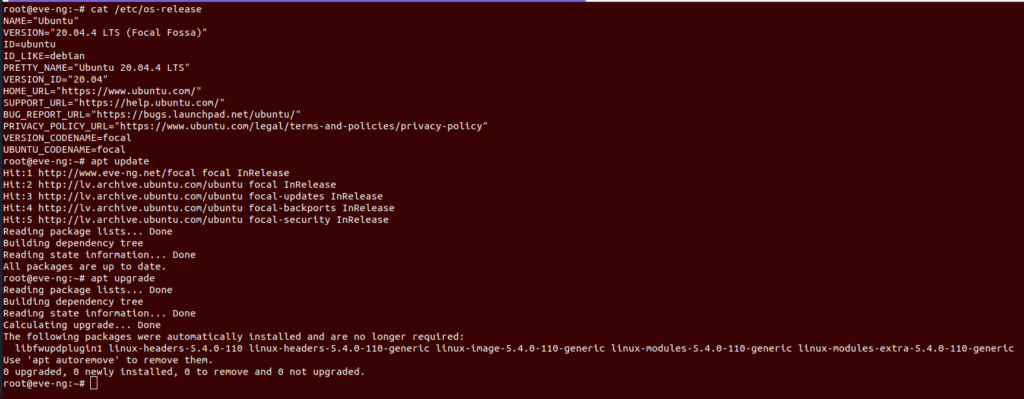
Then reboot the machine
Shutdown -r 0
Adding images to EVE-NG
EVE-NG states that the EVE-NG does not provide copyrighted vendor images for download. You have to find out your own images purchased from the official sources of networking hardware vendors.
Now, you’ll be on the home page where you can define your first network topology,
Let’s go, we want to use eve-ng to emulate devices, I will choose to add a new lab and call it something suitable and save it. It takes me into the lab environment.
Previous
Next
At the beginning we have to provide our own images legally and officially attained to use those images in the first place that’s why eve-ng can’t provide them for us. So, if you gain access to those images you could bring images into EVE-NG environment and get started. One of the quickest ways that you can get access and rights to those images is through Cisco’s modeling labs tool if you’ve purchased that then you can use. Now there are some other tools that we need in order to make this happen. We are going to need establishing a ssh connection into EVE-NG as we’ve cited above, for a couple reasons, the first is so that we can accept the thumbprint of the key pairs that exchange within ssh then also utilize a tool for instance scp for transferring the files into the EVE-NG machine.
I cited Cisco Modeling labs this is :
you could purchase Cisco Modeling lab for instance Cisco Modeling Labs – Personal right there. After purchasing, click download button it takes us into download section for Cisco Modeling Labs, now once it’s taken us into the screen where we see the cml personal too, what we’re trying to do is to pull the files out of an iso file, then what we do is under all releases we version 2.0 and then we click on CML-Personal 2.0 and the file we are looking for is the iso file there, downloading the iso file with the volume of relatively 6 GB, the iso file which comprises all of these images in it that we require to pull out. we as a Linux users have terminal for all stuff that a windows user needs a certain client for each one, for instance ssh client or ftp client.
It is time to put the puzzle together and make this thing come to life, next step we need to do is to get the specific images out of that iso file so that we can put into EVE.NG and that’s we are talking about next.
Mount the iso and look for virl base images, now the images I care about that designing our lab today will be IOSv layer 2 and IOSv which is going to be my layer 3 routers and maybe ASA firewall.
Launch terminal and get a ssh session started into the terminal of EVE-NG machine, now it is time to actually get the images loaded into EVE-NG, when EVE-NG is looking for the images, it looks for folders with a specific name, so let’s check this out from EVE-NG’s website
What I am trying to do right now is import an existing virtual machine so I’m going to click the open a virtual machine right here than in my download section I see I’ve got my folder that I extracted, well jump into it and there is the OVF file that it wants to import so I’ll click open and configure it as every normal virtual machine starting by giving a name to it. After just a moment we see that I now have EVE is listed in my virtual machines. EVE-NG
find out a grid in which there is a naming convention for folders and images you have to obey.
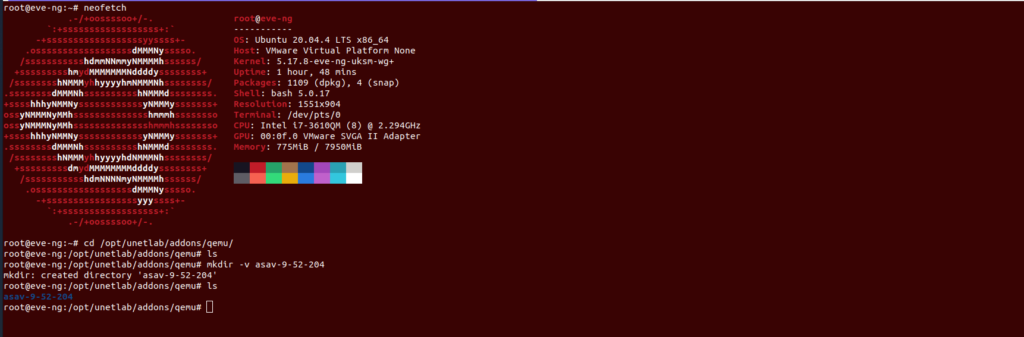
The directory in which we are going to upload the images on the EVE-NG is:
Opt/unetlab/addons/qemu
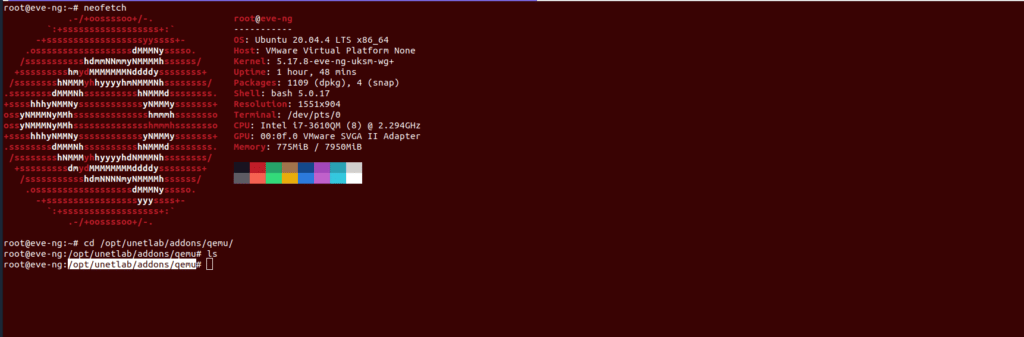
This is where we want to put our images and again they have to follow the naming structure so for asa we are going to create a folder that starts with asav- and then specify the correct version in order to know for future which version of asav we are working with.
be noted that it is running off ubuntu and everything is case sensitive in Linux.
					Mkdir -v asav-9-52-204
Ls -la
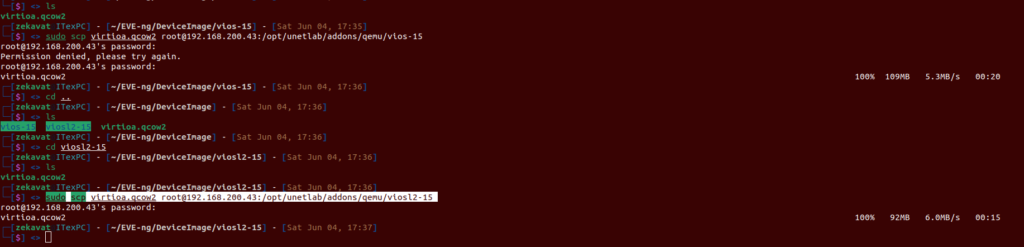
It is time to transfer the images into the EVE-NG, do not forget that not only the folders should be renamed according to the convention but the file name is going to comply with the convention then change the asa.qcow2 file name to virtioa.qcow2 and by using the below command in your Ubuntu system transfer it to the EVE-NG machine:
Sudo scp virtioa.qcow2 root@192.168.200.43:/opt/unetlab/addons/qemu/asav-9-52-204
Previous
Next
Let’s repeat the steps for IOSv and IOSv Layer 2, they listed in EVE-NG as vIOS,
Previous
Next
All set but we’re not finished, there’s one more step that we need to make happen, I’ll tell you where we can go to make this happen, I would say here there’s all sorts of images that we can import from all sorts of vendors one thing is in common with just about every one of these devices is that we need to fix the permissions that are on each one of these devices, let’s click on Cisco ASAv for just a moment in EVE-NG website:
step 5 says clean and fix permissions, you are pretty much going to have run this every single time you upload a new image into EVE-NG so I’m going to copy this little code right here and I’ll bring up my ssh terminal, paste it in and press enter.
/opt/unetlab/wrappers/unl_wrapper -a fixpermissions
Takes a second or two to validate that everything is rocking and rolling, there is no errors thrown here and we done.
Now at this point go to the EVE-NG web portal, right-click on my nodes and here we go, I see the three image which I uploaded into EVE-NG are listed here in a blue colored font.
Previous
Next
Select it and check it out, there is my ASAv, IOSv and IOSv L2
Previous
Next
Connecting the two together by just dragging and dropping the little ethernets together, and lastly on the more action section I can choose start all nodes, once the nodes turn green that means they are coming to life, I can actually click on them to bring up the console and there it is, the nodes themselves are coming into practice and we’ve now gotten images brought into EVE-NG, Let’s start the first lab.
![Network Simu/Emu Tools, EVE-NG [02]](https://old.smenode.com/wp-content/uploads/2022/06/EVE-35.png)
![Network Simu/Emu Tools, EVE-NG [02]](https://old.smenode.com/wp-content/uploads/2022/06/EVE-36.png)
![Network Simu/Emu Tools, EVE-NG [02]](https://old.smenode.com/wp-content/uploads/2022/06/EVE-37.png)
![Network Simu/Emu Tools, EVE-NG [02]](https://old.smenode.com/wp-content/uploads/2022/06/EVE-38.png)
![Network Simu/Emu Tools, EVE-NG [02]](https://old.smenode.com/wp-content/uploads/2022/06/EVE-39.png)
How To Add Cisco IOU/IOL To Eve-ng
Cisco IOU/IOL images are L2/L3 images of Switches and routers which helps you to practice for L3 devices with same features and functions which original devices has. Cisco IOU/IOL images were released for Architecture and testing purposes but today Cisco IOU/IOL images are used for CCIE routig and switching practice for CCIE routing and switching.
Basically Eve-ng support all the Cisco IOU/IOL images
IOL or IOS On Linux, also called IOU or IOS On Unix. IOL, is a simulator available for Cisco internal use only. IOL refers to the Linux version, compiled for i386 architecture. IOU refers to the Unix (Solaris) version compiled for Sparc architecture. The term IOU usually refers to IOL too. Because IOL is an internal IOS version, IOL can be used by Cisco employees or by authorized customers only.
Upload the downloaded image to the EVE
/opt/unetlab/addons/iol/bin
![]()
Type following command to fix permissions
/opt/unetlab/wrappers/unl_wrapper -a fixpermissions

License for Cisco IOU/IOL images
            #! /usr/bin/env python2
print("*********************************************************************")
print("Cisco IOU License Generator - Kal 2011, python port of 2006 C version")
print("Modified to work with python3 by c_d 2014")
import os
import socket
import hashlib
import struct
# get the host id and host name to calculate the hostkey
hostid=os.popen("hostid").read().strip()
hostname = socket.gethostname()
ioukey=int(hostid,16)
for x in hostname:
 ioukey = ioukey + ord(x)
print("hostid=" + hostid +", hostname="+ hostname + ", ioukey=" + hex(ioukey)[2:])
# create the license using md5sum
iouPad1 = b'x4Bx58x21x81x56x7Bx0DxF3x21x43x9Bx7ExACx1DxE6x8A'
iouPad2 = b'x80' + 39*b''
md5input=iouPad1 + iouPad2 + struct.pack('!i', ioukey) + iouPad1
iouLicense=hashlib.md5(md5input).hexdigest()[:16]
print("nAdd the following text to ~/.iourc:")
print("[license]n" + hostname + " = " + iouLicense + ";n")
print("You can disable the phone home feature with something like:")
print(" echo '127.0.0.127 xml.cisco.com' >> /etc/hostsn")
Copy above text and create a text file and save as with name
IOUkeygen.py
After creating license python script, upload it to Eve-ng directory
–/opt/unetlab/addons/iol/bin/
After uploading the script go the directory by using below command
cd /opt/unetlab/addons/iol/bin/
Check the directory content by below command
ls -l
you will be able to see file with name – IOUkeygen.py
Now run the python script by using below command
python2 IOUkeygen.py
It will give you some like below output
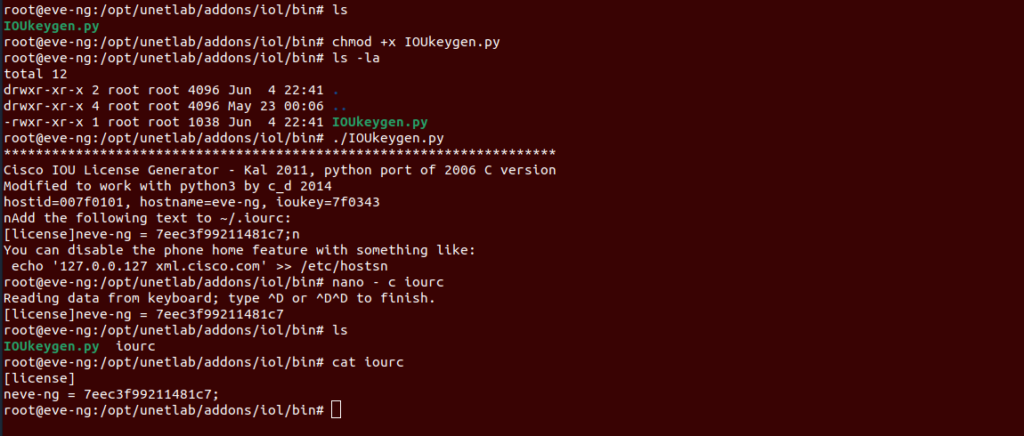
Now, we will create license for IOU/IOL images
nano - c iourc
paste the license and press ctrl+x to save
            [license]
eve-ng = 972f30267ef51616;
We have successfully added the Cisco IOU/IOL images to eve-ng with license.
Previous
Next
