
Audiences: Candidates who want to prepare for CCIE Data Center (v3.0)
Scope: 1.1.b Tagging/Trunking from CCIE Data Center (v3.0) Exam Topics – Practical Exam
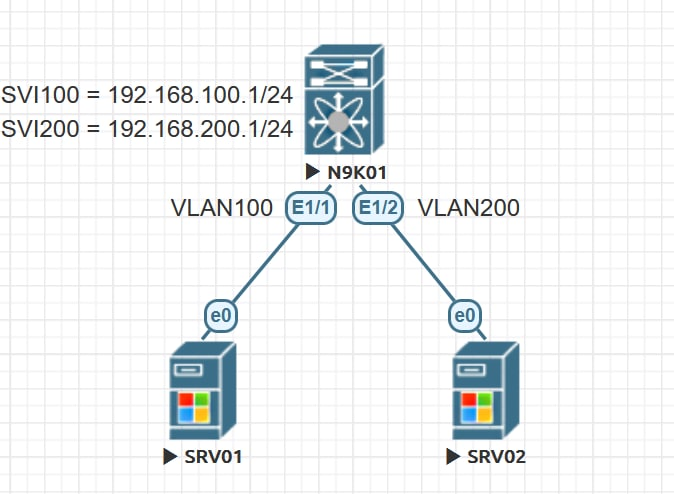
Inter-VLAN Routing
Although we can route between two VLANs with a router 802.1Q trunk (Router-On-A-Stick AKA ROAS), but that is not in the scope of our CCIE Data Center curriculum; instead, we are going to cover how IVR works with a Cisco Nexus switch.
This is facilitated by creating a Switch Virtual Interface (SVI) which is a logical interface in a particular VLAN (or simply a VLAN interface). You can simply create an SVI by employing interface vlan vlan-id global command. Note that this interface is a TCP/IP Layer-3 routed interface. You can then assign an IP address under the interface configuration. That IP address will be the default gateway of your hosts in that VLAN.
How to Configure IVR
To configure IVR, you only need to create the SVIs and give them their IP addresses. In order to create an SVI, you would need to enable the feature on NX-OS (Nexus Operating System). In the example below, I have created two SVIs, one for each VLAN 100 and VLAN 200. Remember that these SVIs can be the default gateway of their respective VLANs:
N9K01# configure terminal
N9K01(config)#feature interface-vlan

N9K01(config)# vlan 100
N9K01(config-vlan)# name VLAN100
N9K01(config)# vlan 200
N9K01(config-vlan)# name VLAN200

N9K01(config)#interface Vlan 100
N9K01(config-if)#no shutdown
N9K01(config-if)#ip address 192.168.100.1/24

N9K01(config)#interface Vlan 200
N9K01(config-if)#no shutdown
N9K01(config-if)#ip address 192.168.200.1/24
From this point, we don’t need to do anything further as the SVIs are Layer-3 interfaces and they will appear as attached in the routing table.
N9K01# show ip route
IP Route Table for VRF "default"
'*' denotes best ucast next-hop
'**' denotes best mcast next-hop
'[x/y]' denotes [preference/metric]
'%<string>' in via output denotes VRF <string>

192.168.100.0/24, ubest/mbest: 1/0, attached
    *via 192.168.100.1, Vlan100, [0/0], 00:14:34, direct
192.168.100.1/32, ubest/mbest: 1/0, attached
    *via 192.168.100.1, Vlan100, [0/0], 00:14:34, local
192.168.200.0/24, ubest/mbest: 1/0, attached
    *via 192.168.200.1, Vlan200, [0/0], 00:14:03, direct
192.168.200.1/32, ubest/mbest: 1/0, attached
    *via 192.168.200.1, Vlan200, [0/0], 00:14:03, local
NX-OS can now perform IVR between the two VLANs.
SVI Autostate
When you create an SVI, there is a calculation based on which the switch decides to mark the interface as up/up or down/down state. Here is the summary of the calculation:
- Is there at least one access port in that VLAN whose status is up/up? If yes, the SVI is also up/up
- Is there any trunk port for that VLAN in forwarding state? If yes, the SVI is also up/up
In this post, you will learn how to change this default expectation and exclude some interfaces or all interfaces from that calculation and make it up/up always regardless of the state of trunk or access port of its VLAN. Why you might need this? One reason that you might want an SVI be always up/up even if it does not meet the aforementioned conditions, is that you want to reach its IP from another Layer-3 domain even if there is no host in than VLAN. Here are three ways you can configure autostate.
- Under the physical interface or portchannel itself
- Globally for all interfaces
- Per SVI basis
Exclude SVI autostate under the physical interface or portchannel
Here is an example of how we exclude an Ethernet interface from the calculation
N9K01# configure terminal
N9K01(config)# interface ethernet 1/1
N9K01(config-if)# switchport autostate exclude
Negate SVI autostate globally for all interfaces
Below is an example of how to disable the autostate calculation globally by default
N9K01# configure terminal
N9K01(config)# no system default interface-vlan autostate
Negate SVI autostate per SVI basis
Here is an example of how to disable autostate feature per SVI itself
N9K01# configure terminal
N9K01(config)# interface vlan 100
N9K01(config-if)# no autostate
Workshop
In this lab, we are going to configure the IVR between VLAN 100 and VLAN 200.
feature interface-vlan

vlan 100
  name VLAN100
vlan 200
  name VLAN200

interface Vlan100
  no shutdown
  ip address 192.168.100.1/24

interface Vlan200
  no shutdown
  ip address 192.168.200.1/24

interface Ethernet1/1
  switchport access vlan 100
  spanning-tree port type edge

interface Ethernet1/2
  switchport access vlan 200
  spanning-tree port type edge
Resources
You can download EVE-NG setup from here:
