
Lab Introduction
It is undeniable that during a learning process it would be helpful if we could deal with the examples of real-life challenges in order to commit to memory and put them into practice. For practicing in the realm of data transmission network. They help to simulate and emulate the traffic flow, configurations, related procedures and the behavior of network protocols which we are facing in the field. The lab environments help to figure out the connected concepts and decrypt how to accomplish. There are 3 well-known solutions in which we can wrap up the subjects.
Network Emulation & Virtual Environment taking advantage of EVE-NG
Emulated Virtual Environment Next Generation or EVE-NG
EVE-NG is a network emulation tool on the order of GNS3 delivering network admins with solutions to simulate routers, switches, firewall and numerous other appliances. You are able to design a network lab with devices from Cisco, Juniper, Checkpoint, Palo Alto, Arista, A10, Citrix, SonicWALL, PfSense, Trend Micro and to name but a few.
I am really interested in crawling EVE-NG’s feature set, let’s see what EVE-NG has to present;
Key Features
- KVM HW acceleration
- Topology designer “click and play”
- Import/export configuration
- Labs xml file format
- Picture import and maps “click and play”
- Custom kernel support for L2 protocols
- Memory optimization ( UKSM )
- CPU Watchdog
- Full HTML5 User Interface
- Ability to use without additional tools
- Multiuser
- Interaction with real network fully supported
- Simultaneous lab instance
- Derivate from Ubuntu LTS 16.04 server for long term support
- UNetLab Labs backwards compatibility
- Ability to quick transpose real network to virtualization
- Creating custom, from Visio or other means, Pictures and making them clickable as in Lab canvas
- Describe and mark in canvas with different shapes and texts annotations
Objectives
Community Edition
Professional Edition
Community Edition
Sharing of design (option to share labs, configs online with friend or others)
General UI improvements (to be able to make 99% of things from UI, CLI will remain of course for advanced users)
Clientless – telnet, rdp, vnc over html5
Local client Wireshark capture
Import/export configs
And much, much more
Professional Edition
Dynamic console porting, no limits, fixing issues for multi user consoling, Telnet porting choose is random
Hot links, interconnection running nodes, ports immediately response, shut no shut, Ethernet only
1024 nodes support per lab
Docker containers support
HTML desktop console to EVE management, clientless EVE management
Closing feature of running lab placing it to running folder, option run more than one lab simultaneously
Import/export configs for eve lab to/from local PC
Multiuser support, Administrator role only
EVE User account access time limitation
NAT cloud, integrated NAT option with DHCP on the EVE
Integrated Wireshark capture using docker, ethernet only
Multi configurations for single lab
Lab timer for self-training
How marvelous! So here we go to find out the differences between the leaders of network emulation, as ipwithease.com has written in a fabulous way;
Differentiating GNS3 vs Eve-NG vs VIRL
- With the annual subscription, one can avail access to VIRL for the network device software images. With the other network emulators, these software images are only accessible via the service contract or a program conducted by a college.
- VIRL is easier and up with more features when it comes to the configuration automation while comparing it with GNS3 or EVE-NG.
- When it comes to the setbacks then VIRL faces them in the form of base resource optimum utilization of VIRL server appliance as well as the shortage of support when it comes to the serial interfaces.
- Both the features are better with GNS3 and EVE-NG when compared with VIRL.
- While comparing GNS3 vs EVE-NG, we find that GNS3 is a free, open-source community that has built a well-documented piece of software.
- It does follow a traditional client/server application model, but the best part is that the server component is easy to configure, deploy and maintain. In the case of EVE-NG, it comes in both free community edition and professional paid edition.
- One key setback with GNS3 is that you are required to source own network device software images in order to emulate.
- But it is not needed to be observed as a fault because bundling software images from Cisco IOS with GNS3 would turn out to be illegal.
- Similarly, EVE-NG also requires licensed access in order to get to the network device software images.
- While comparing GNS3 vs Eve-NG vs VIRL on the grounds of operating as a specialized network emulator, we would find that only EVE-NG is the one which is a clientless network emulator performing virtually.
- On the other hand, both VIRL and GNS3 require you to first download and then install an independent application to manipulate the functioning of network devices on the server.
- Both VIRL and GNS3 require a separate terminal application to function, EVE-NG only needs a lightweight terminal application like PuTTY, in order to build and modify a network topology.
- The entire process can easily be accomplished via an HTML 5 web client and it can not only be used over desktop but also on various mobile devices too!
Comparison Table: GNS3 vs VIRL vs EVE-NG
Comparison by ipwithease.com
| PARAMETER | GNS3 | VIRL | EVE-NG |
Origin |
An open-source, free server/client interface meant for virtualization and network emulation. It is a Python based platform and supports Cisco router platforms. |
A Cisco invented proprietary virtual network emulator that is highly regarded by individuals and educational institutions. Preferable choice for enterprise network. |
First clientless multi-vendor virtual network simulator that has been developed for individuals and for smaller businesses. Both free community edition and paid professional editions are available. |
|---|---|---|---|
|
Access to Software Images |
Only accessible via the service contract or a program conducted by a college. |
Can access them with annual subscription. |
Only accessible via the service contract or a program conducted by a college. |
|
Resource Optimization and Support |
Both resource utilization and interface support are better than VIRL. |
Limited base resource optimum utilization of server appliance and shortage of support to the serial interfaces. |
Both resource utilization and interface support are better than VIRL. |
|
As a Specialized Network Emulator |
Requires to first download and then install an independent application to control network devices on the server. |
Also requires to first download and then install an independent application to control network devices on the server. |
Functions as a clientless network emulator performing virtually. |
|
Terminal Application Requirement |
Requires separate terminal application to function and modify network topology. |
Requires separate terminal application to function and modify network topology. |
Only needs lightweight terminal application like Putty, to build and modify a network topology. Can be used on both desktop and mobile devices. |
EVE-NG Editions
Free EVE Community Edition
EVE-NG Professional
EVE-NG Learning Center
Free EVE Community Edition
- Price: Free
- User’s Roles: admin only [Restrictions of the EVE usage, WEB UI, per user based]
- Node limit per lab: 63
- TCP ports: fixed 128 per POD [Automatic TCP port choose for telnet session]
- Local Wireshark capture [Local wrapper using ssh and root password to the EVE]
- Local Telnet Client [Local wrapper using locally installed telnet client]
- Local VNC Client [Local wrapper using locally installed vnc client]
- HTML console without Wireshark capture
- EVE Cook Book
- Dark Mode
EVE-NG Professional
- Price: 99 EUR w/o VAT
- User’s roles: admin only [Restrictions of the EVE usage, WEB UI, per user based]
- Lab Timer [Timer for Lab training]
- Running labs folder [User can run more than one lab. Running labs will appear in special running labs folder. Per user based]
- Node limit per lab: 1024
- TCP ports: Dynamic 1-65000 [Automatic TCP port choose for telnet session]
- Local Telnet client [Local wrapper using locally installed telnet client]
- Local VNC client [Local wrapper using locally installed vnc client]
- Wireshark integrated [Docker integrated wireshark]
- Docker container support
- Running nodes interface connections (hot connections) [Hot/live nodes interface connection]
- NAT Cloud [Integrated NAT cloud, connect node to the internet. NAT to the EVE management interface DHCP 172.29.129.0/24, gateway .254]
- HTML console with Wireshark capture
- HTML Desktop Console [Integrated Docker PC management]
- Multi startup configuration choose per lab [Option to create and boot lab from different startup configurations, multi startup config]
- Export/Import configs or config packs to local PC [Option import and export single config or config packs to the lab]
- EVE user Radius authentication [Multi Radius servers support]
- Custom image template, cli based [Option create own image templates.]
- Lab chat between EVE lab users
- Custom MAC address for Qemu nodes [Option to change first interface MAC address for qemu nodes]
- Link Quality, Delay, packet loss, jitter [Feature allows apply link quality functions: packet loss, delay and rate]
- Link design feature [Option to change connection colour, style]
- Rich integrated text editor [Rich HTML text editor for text and objects management in the lab.]
- Advanced Lab design objects [Round square, lines, arrowed lines, style and colour]
- Admin user option to join in other user lab [Admin user can join to the other user lab in the parallel session]
- Admin user option to open parallel console session to other user node
- Running labs and nodes management
- EVE Cook Book
- Info about HDD/labs use per user, User infoweb GUI
- Serial interface capture (IOL only)
- Link state and suspend / resume
- Dark Mode
- Lab Task management [Option to add offline pdf or online document into lab Task]
- EVE Cluster [Multi servers EVE system]
EVE-NG Learning Center
- Price: 99 EUR + Added Roles
- User’s roles: admin only [Restrictions of the EVE usage, WEB UI, per user based]
- Lock user per folder [User cannot see other EVE folders, only his own]
- Lock user edit rights [User cannot edit labs, images etc]
- Shared Lab Folder [Shared lab folder visible for all users]
- User’s account validity (1/4 Hour accuracy) [Ability to set calendar validity for account, Date and time ( From -> To )]
- Lab Timer [Timer for Lab training]
- Running labs folder [User can run more than one lab. Running labs will appear in special running labs folder. Per user based]
- Node limit per lab: 1024
- TCP ports: Dynamic 1-65000 [Automatic TCP port choose for telnet session]
- Local Telnet client [Local wrapper using locally installed telnet client]
- Local VNC client [Local wrapper using locally installed vnc client]
- Wireshark integrated [Docker integrated wireshark]
- Docker container support
- Running nodes interface connections (hot connections) [Hot/live nodes interface connection]
- NAT Cloud [Integrated NAT cloud, connect node to the internet. NAT to the EVE management interface DHCP 172.31.31.0/24, gateway .254]
- HTML console with Wireshark capture
- HTML Desktop Console [Integrated Docker PC management]
- Multi startup configuration choose per lab [Option to create and boot lab from different startup configurations, multi startup config]
- Export/Import configs or config packs to local PC [Option import and export single config or config packs to the lab]
- EVE user Radius authentication [Multi Radius servers support]
- Custom image template, cli based [Option create own image templates.]
- Lab chat between EVE lab users
- Custom MAC address for Qemu nodes [Option to change first interface MAC address for qemu nodes]
- Link Quality, Delay, packet loss, jitter [Feature allows apply link quality functions: packet loss, delay and rate
- Link design feature [Option to change connection colour, style]
- Rich integrated text editor [Rich HTML text editor for text and objects management in the lab.]
- Advanced Lab design objects [Round square, lines, arrowed lines, style and colour]
- Admin user option to join in other user lab [Admin user can join to the other user lab in the parallel session]
- Admin user option to open parallel console session to other user node
- Running labs and nodes management
- EVE Cook Book
- Info about HDD/labs use per user, User infoweb GUI
- User quota (limit cpu/ram per user)
- Serial interface capture (IOL only)
- Link state and suspend / resume
- Dark Mode
- Lab Task management [Option to add offline pdf or online document into lab Task]
- EVE Cluster [Multi servers EVE system]
EVE-NG Licensing Model
EVE Pro License definition
The EVE-NG Licensing is based on the concurrent (parallel) sessions to EVE server. Meaning, if you want 10 users to use EVE at the same time, you must have 10 Licenses.
Let’s install and configure EVE-NG on an Ubuntu/Linux system
Okay It is interesting to know that There are two major ways in order to take advantage of EVE-NG, EVE-NG is a virtual machine runs on the top of a hypervisor, now the point is here, hypervisor, you could get started EVE-NG in the form of Bare metal or in a nested scenario. Definitely bare metal would be recommended due to more efficient resource management.
EVE-NG Cookbook;
[…] Because EVE-NG runs many hypervisor, it’s strongly recommended a physical server dedicated for it, without any virtualization software. Mind that nested virtualization is not a good thing and can lead to poor performance.
Required CPU and RAM depend on how many nodes are needed to run. 4 vCPU and 6GB of RAM can be enough for IOU/IOL and Dynamips only, but will be insufficient for topology with CSR1000V routers.
Bare hardware server EVE installation
First, download the EVE-NG installation ISO, following EVE-NG community cookbook – Bare hardware server EVE installation:
Mandatory Prerequisites: Internet must be reachable from your Server. EVE ISO installation requires internet access to get updates and install the latest EVE-COMM version from the EVE-NG repository. DNS must work as well, to check it, do a named ping, for example ping www.google.com
Create a bootable DVD disk or USB flash drive with an Ubuntu server image. Boot your server from ISO. Chose Install EVE-NG Community Server and confirm with Enter.
Select English language. Confirm with Enter.
Make sure if English US keyboard is selected and confirm with Enter.
If your network has DHCP ENABLED, Continue to Step 10
If your network has not DHCP. Static IP setup. If you have not enabled DHCP in the network, you must assign an IP address manually. Use arrow UP key to select your interface for IP
Confirm interface selection with Enter, select “Edit IPv4” and confirm with Enter again.
Hit Enter on IPv4 Method and select “Manual”, confirm with Enter.
Enter your “Subnet”, “IP Address”, “Gateway IP”, “Domain server IPs” and “Search domain”. Select “Save” and confirm with Enter. NOTE, it is very important that your DNS (Name servers) will resolve Internet names.
Select “Done” and confirm with Enter
If your DHCP IP settings are correct, select Done and confirm with Enter.
If you have proxy in use for your internet, assign your network proxy settings. If no proxy in use, with Tab key select Continue and confirm with Enter.
Select “Continue” and confirm with Enter.
After the Ubuntu “Install Complete” select “Reboot Now” and hit Enter to continue.
Remove CD/DVD ISO Media.
Return back to EVE console screen and confirm Continue with Enter, EVE VM will reboot and continue Phase 2 installation
Depending on your internet speed EVE installation will take some time. After installation EVE VM will auto reboot and EVE login screen will appear, login in CLI with will root/eve and follow next installation Phase
Setup EVE Management IP address. A Static IP address setup is preferred
Follow steps in section: 3.5.1 for static IP, 3.5.2 for DHCP IP
After your EVE is rebooted, Login to EVE CLI and type:
apt update
apt upgrade
Verify your EVE-NG server installation, type the below command, it must display latest EVE Community version
dpkg -l eve-ng
If your newly installed EVE-NG Community shows nothing like above, you must check your internet reachability and verify DNS configuration on your EVE-PRO server.
Another way to install EVE-NG in a bare metal environment
- Installed Ubuntu
- Install updates
- A bit of OS configuration
- Set root password
- Verify host name in
            /etc/hostname
and
/etc/hosts
-
- Set PermitRootLogin to yes in
/etc/ssh/sshd_config
-
- Set GRUB_CMDLINE_LINUX_DEFAULT to net.ifnames=0 noquiet in
/etc/default/grub
-
-
- Update grub with
-
update-grub
-
- Rename network interface to eth0 in
            /etc/network/interfaces
/etc/netplan/50-cloud-init.yaml
-
- Reboot
- Installed EVE-NG community edition
o wget -O - http://www.eve-ng.net/repo/install-eve.sh | bash -i
-
- Reboot
- SSH into EVE-NG server as root, password eve
- Complete install wizard
Installing EVE-NG using VMware Workstation in a nested architecture
This method could be more accessible due to lack of hardware resources,
I assumed that you have VMware workstation pro or VMware workstation player installed and configured on your local system,
Download VMware Workstation Player
Download VMware workstation Pro
then we have workstation up and running,
At the beginning go ahead to the below link, find out the desired edition you are looking for:
I am going to download the CE in a form of OVF
Excuse me, just a minute, what does OVF mean here?
OVF and OVA File Formats and Templates
First of all, I was wondering if we could cite anything around OVF and OVA;
OVF is a file format that supports exchange of virtual appliances across products and platforms. OVA is a single-file distribution of the same file package. Exporting OVF or OVA templates allows you to create virtual appliances that can be imported by other users. You can use the export function to distribute pre-installed software as a virtual appliance, or to distributing template virtual machines to users.
It would better to say that OVF is an open standard, specified by the Distributed Management Task Force (DMTF), for packaging and distributing a virtual appliance consisting of one or more virtual machines (VMs).
An OVF Package is composed of metadata and file elements that describe virtual machines, plus additional information that is important to the deployment and operation of the applications in the OVF package. Its file extension is .ovf .
An Open Virtual Appliance (OVA) is an OVF Package in a single file archive with the .ova extension.
Okay I tried out to shed some light on the conception of OVA/OVF, let’s get back to the EVE-NG, in the page of downloading EVE-NG what are we looking for?
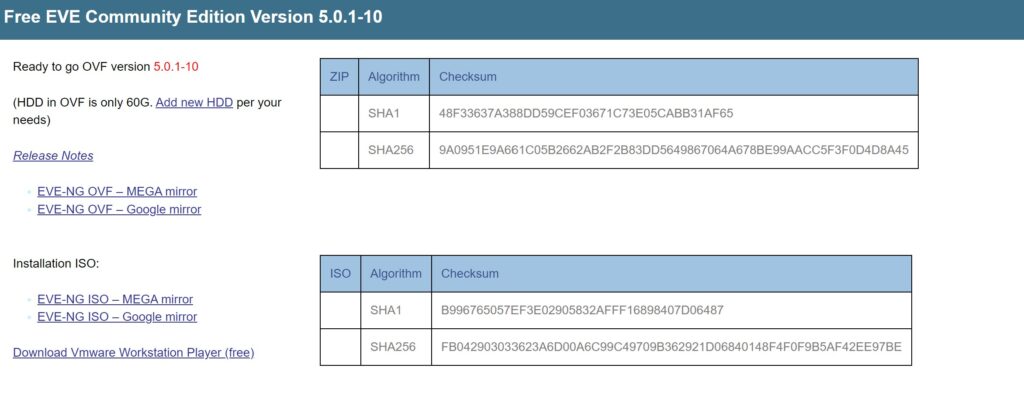
right here you can see, we have OVF files, that’s really what I’m talking about when I talk about importing a virtual machine into VMware workstation or ESXi.
The iso is when we need to customize or do a custom install of EVE-NG.
After downloading the source, I am going to extract this file,
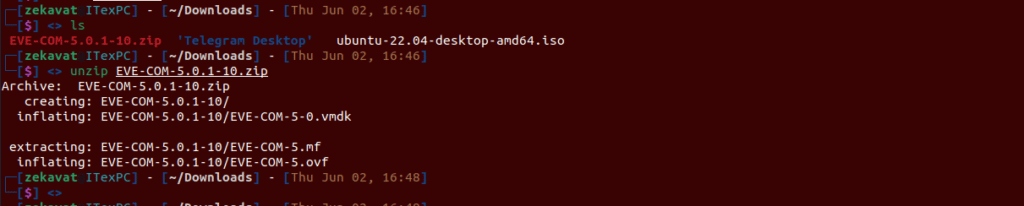
					Unzip EVE-COM-5-0-10.zip
Ls -la

The OVF is the file that contains all of the information about the virtual machine and the vmdk is the file that actually holds the hard drive itself and this is everything we need to get started with EVE-NG.
Now it is time to launch VMware workstation, now I’ve got VMware workstation already up and running,
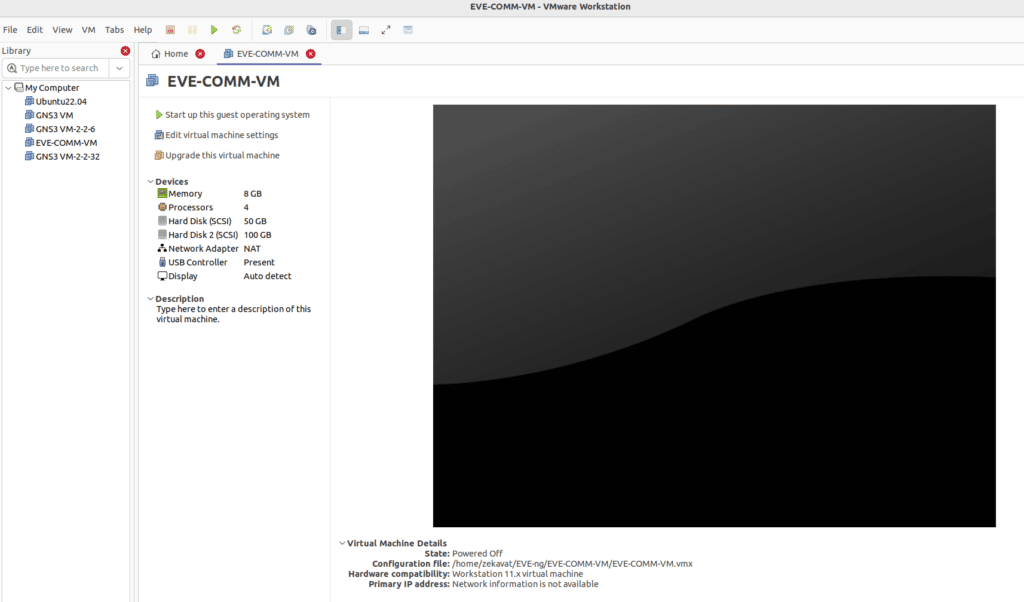
What I am trying to do right now is import an existing virtual machine so I’m going to click the open a virtual machine right here than in my download section I see I’ve got my folder that I extracted, well jump into it and there is the OVF file that it wants to import so I’ll click open and configure it as every normal virtual machine starting by giving a name to it. After just a moment we see that I now have EVE is listed in my virtual machines. EVE-NG
Previous
Next
EVE-NG runs on Ubuntu now by default it gives it 8GB of ram and if you’re going to be trying to run larger topologies and larger virtual machines, things like the sd-wan topologies or the csr1000v, eight gigs of ram might not cut it, so you may want to do editing virtual machine settings and allocate the suitable and desirable amount of ram and cpu cores that fits your topologies.
It is time to turn on my virtual machine and EVE-Ng is coming to life right now; you can see the IP address of EVE-NG that I can access EVE-NG and also it tells me the default root password id eve. I need to access my console of this VM I can type in the login of root and the password of eve and there we go it’s brought me in, now it wants me to type in a root password, I’ll type in a password and confirm the password and leave the hostname as it is, I don’t need to worry about the domain name, DHCP settings are fine for me and configuring other stuff like ntp if you would like that, now it reboots with the new setting that we have applied.

I’ll bring up my web browser and we’ll go to the IP address of EVE-NG, there we go I now have a login session; I can type in the username of admin and the password of eve and click sign in, I am officially signed in to my EVE-NG environment. Now you are ready to rock and roll with EVE-NG moving to the next steps like installing client tools and adding images to EVE-NG.
Previous
Next
Go to the next page, it continuous…
