
we came from the previous page here…
As you remember clearly, we configured the license for IOU before then we have to add the images,
In the GNS3 Preferences menu, select IOU Devices, then click New, select the option which says ‘Run this IOU device on the GNS3 VM’ (Linux users can run IOU images via the local server. If a remote server has been set up, then that optional will become available)
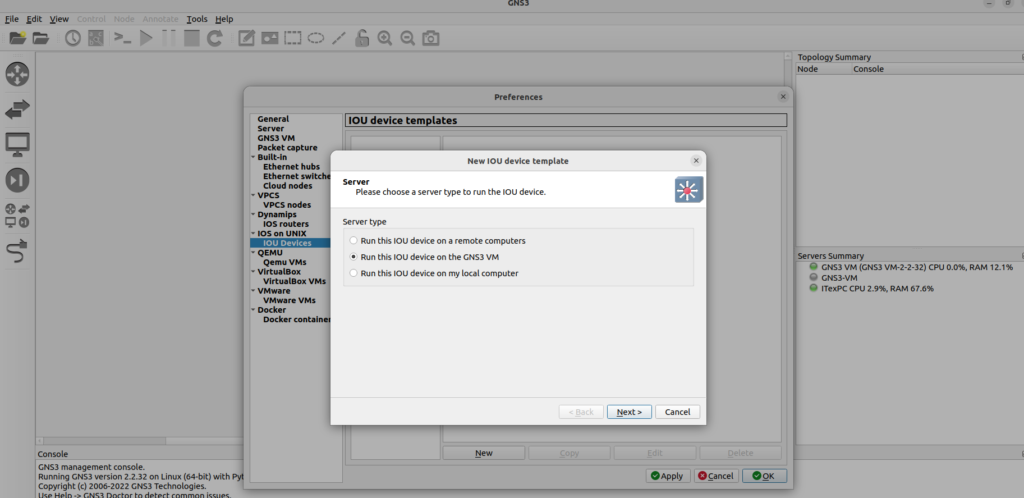
Next, you will be prompted to:
Give the device a name
Select an image type. (L2 image and L3 image are selectable in the dropdown menu)
Browse your filesystem to select the IOU image you want to import.
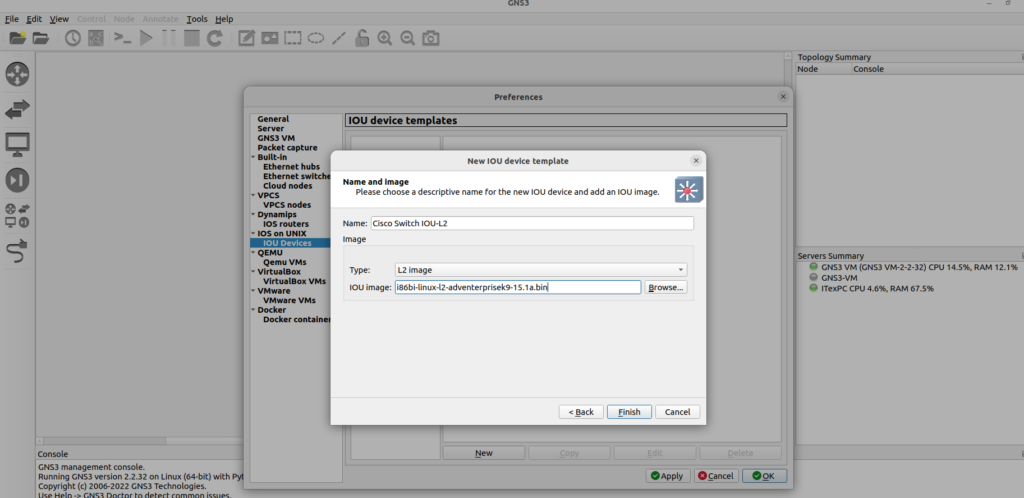
Click Finish to complete the import process then add the suitable L3 image.
Previous
Next
Your device is now listed among the IOU device templates
Your IOU device will be selectable in the Switches or Routers device lists, depending on whether an L2 or L3 IOU image was used.
(Both types appear in the All-Devices list)
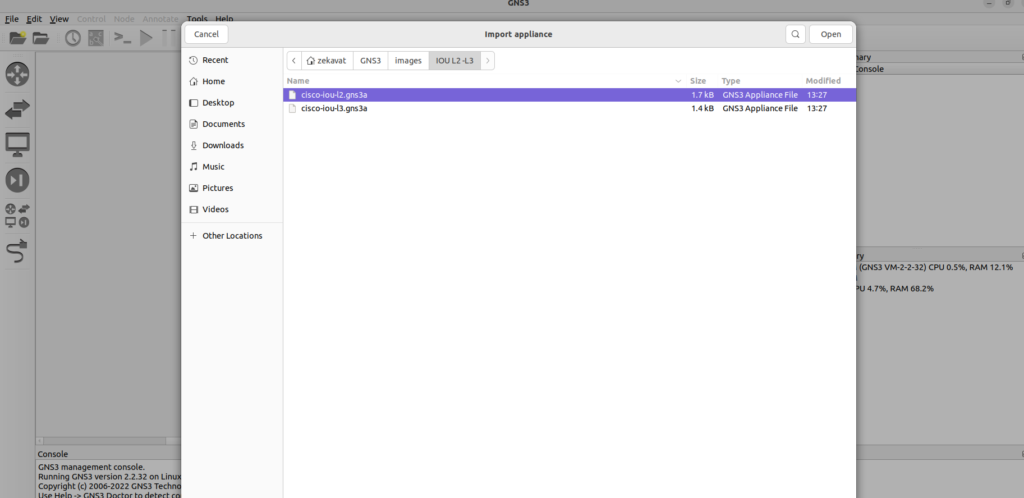
There are also IOU appliance templates available in the Appliances section of the GNS3 Marketplace to automate this process. Downloading. gns3a appliance templates, and using the Import Appliance wizard to import appliances,
Import the Appliance
In the GNS3 user interface, click File and then Import appliance:
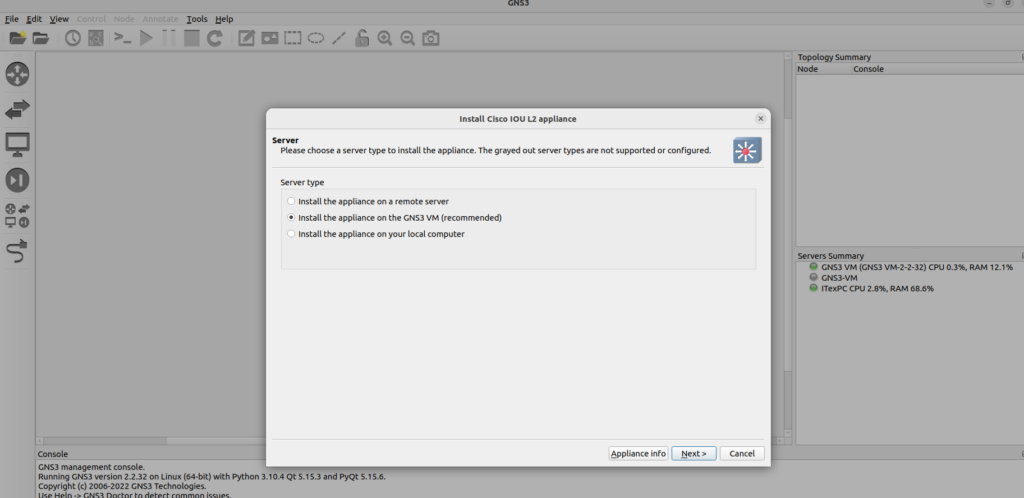
We are dealing with using the GNS3 VM to run the IOSvL2 on Ubuntu, so select the ‘Install the appliance on the GNS3 VM’
The Required files window displays:
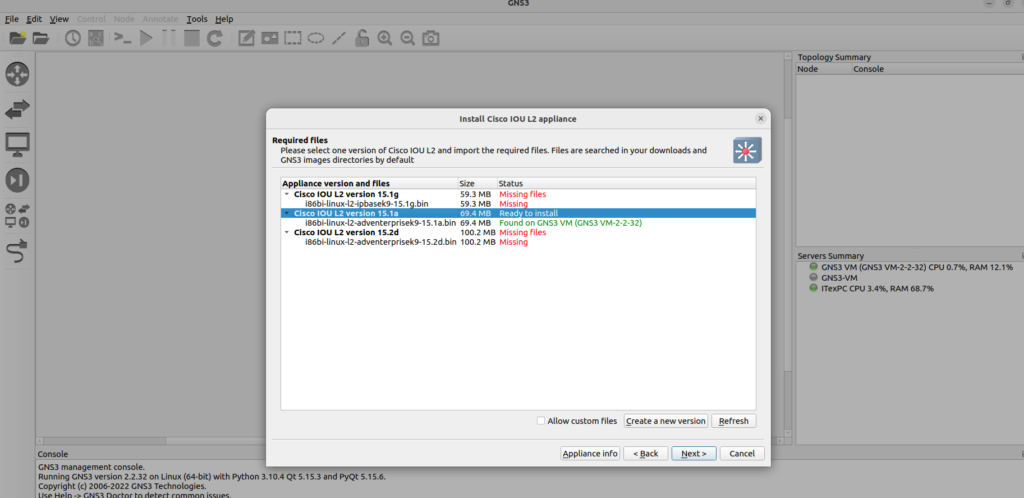
Select the version of the VM you wish to install, highlight its file name, and click “Import”. However, I manually imported the image so you see, it says ‘Ready to install’
(This presumes you already have that file contained in your filesystem. If you do not, you can click Download, which will open a new browser tab with the relevant website open. Not all images/VMs are free. As such, clicking Download for ones like IOSvL2 will redirect you to the Cisco’s VIRL website)
A Usage screen is displayed. Click Finish to complete the appliance addition
Previous
Next
What is listed in the Usage window will vary, based on the imported device. As IOSvL2 and L3 is a Multilayer switch vm and Layer 3 router vm, it will be added to the Switch category in the Device Toolbar.
Click the Browse all Devices menu option to view the newly imported GNS3 appliance:
Previous
Next
View Appliance Settings
Optional: You can view and change the appliance settings by clicking Edit and then Preferences in the GNS3 GUI:

Starting a network designing by using an appliance
Once you have imported the new appliance into GNS3 environment, you can build topologies and utilizing the GNS3 appliances. Drag and drop the appliances from the GNS3 Toolbar to the GNS3 workspace.
Creating a network topology by dragging devices into the GNS3 workspace and connecting them as desired:
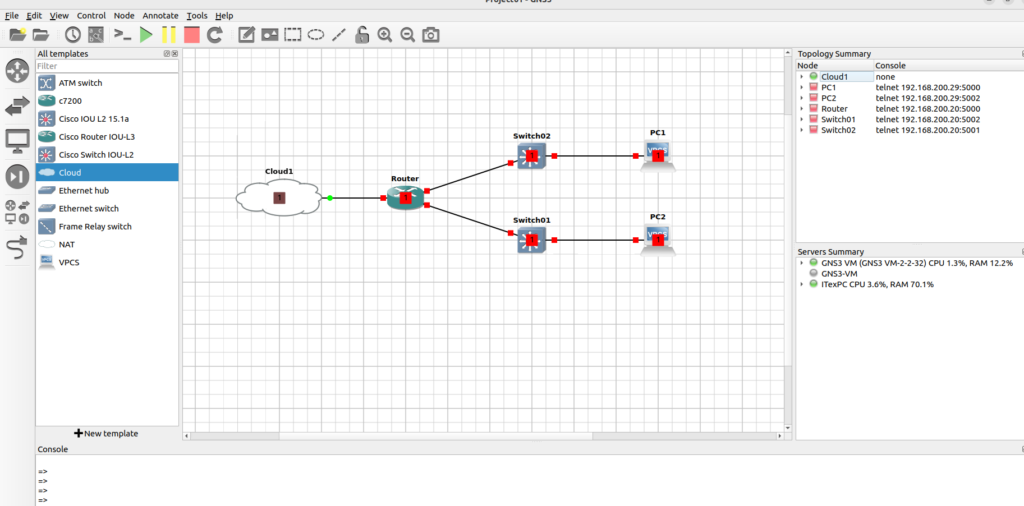
Once you have created your topology, start the appliance: right click on the appliance and click Start):
(Optionally, you can press the Play/Resume bottom in the Toolbar to start all topology devices simultaneously)

Ready to go, eventually everything is green 😊
Important Points for Cisco IOS images for Dynamips
GNS3 offers multiple ways to emulate IOS. For older images, we use and maintain Dynamips; an emulator dedicated to emulate some Cisco hardware. Dynamips can run unmodified IOS images. In the new GNS3 1.4, there is a way to run a second category of switches and routers. These are classified as Routing and Switching virtual machines (or R+Svms) for short. What are the differences? Here are the major differences:
IOS images are usually run in Dynamips however R+Svms are housed in a virtual machine.
IOS images are lower in cpu and memory so you can fit more of them in one topology.
R+Svms are all vendor Routing and Switching images that are larger in size but can be imported into GNS3 for real world network emulation.
IOS 15.x
Only the c7200 series get newer IOS 15 images. All other platforms are now end-of-life and only support IOS 12.4. Please note that the IOSv appliance is based on IOS 15 and there are IOU (IOS on UNIX) images with IOS 15.
GNS3 recommends mainline over technology train if you are interested on stability without the need of new features
Recommended images
GNS3 really recommend using the c3640, c3660, c3725, c3745 and c7200 IOS images listed below, they have proven to be the most stable in GNS3 provided you use the right amount of RAM and Idle-PC value.
C1700 Series
C2600 Series
C3620
C3660
C2691
C1700 Series
1700s have 1 FastEthernet fixed port (C1700-MB-1ETH) on its motherboard, 2 subslots for WICs (maximum of 2 Ethernet ports or 4 serial ports), and no Network Module slots. Note that interfaces do not use a slot designation (e.g. “f0”)
IOS version 12.4.25d (Mainline) File name: c1700-adventerprisek9-mz.124-25d.bin
IOS version 12.4.15T14 (Technology train) File name: c1700-adventerprisek9-mz.124-15.T14.bin
C2600 Series
2600s have one or two Ethernet or FastEthernet interfaces on its motherboard, 3 subslots for WICs (maximum of 6 serial ports) and 1 Network Module slot (maximum of 4 Ethernet ports or 16 FastEthernet ports).
IOS version 12.4.25d (Mainline) File name: c2600-adventerprisek9-mz.124-25d.bin
IOS version 12.4.15T14 (Technology train) File name: c2600-adventerprisek9-mz.124-15.T14.bin
C3620
The c3620 supports up to 2 Network Modules (maximum of 8 Ethernet ports, 32 FastEthernet ports or 8 serial ports). Note that tt shouldn’t be used since the latest available IOS image is very old.
IOS version 12.2.26c File name: c3620-a3jk8s-mz.122-26c.bin
C3660
The c3660 has 2 FastEthernet fixed ports (Leopard-2FE) and supports up to 6 Network Modules (maximum of 24 Ethernet ports, 32 FastEthernet ports or 24 serial ports).
IOS version 12.4.25d (Mainline) File name: c3660-a3jk9s-mz.124-25d.bin
IOS version 12.4.15T14 (Technology train) File name: c3660-a3jk9s-mz.124-15.T14.bin
C2691
The c2691 has 2 FastEthernet interfaces its motherboard (GT96100-FE), 3 subslots for WICs (maximum of 6 serial ports) and 1 Network Module slot (maximum of 16 FastEthernet ports or 4 serial ports).
IOS version 12.4.25d (Mainline) File name: c2691-adventerprisek9-mz.124-25d.bin
IOS version 12.4.15T14 (Technology train) File name: c2691-adventerprisek9-mz.124-15.T14.bin
C3725
C3745
C7200 SERIES
Cisco Catalyst Switches
C3725
The c3725 has 2 FastEthernet interfaces on its motherboard (GT96100-FE), 3 subslots for WICs (maximum of 6 serial ports) and 2 Network Module slots (maximum of 32 FastEthernet ports or 8 serial ports).
IOS version 12.4.25d (Mainline) File name: c3725-adventerprisek9-mz.24-25d.bin
IOS version 12.4.15T14 (Technology train) File name: c3725-adventerprisek9-mz.124-15.T14.bin
C3745
The c3745 has 2 FastEthernet interfaces on its motherboard (GT96100-FE), 3 subslots for WICs (maximum of 6 serial ports) and 4 Network Module slots (maximum of 32 FastEthernet ports or 16 serial ports).
IOS version 12.4.25d (Mainline) File name: c3745-adventerprisek9-mz.124-25d.bin
IOS version 12.4.15T14 (Technology train) File name: c3745-adventerprisek9-mz.124-15.T14.bin
C7200 SERIES
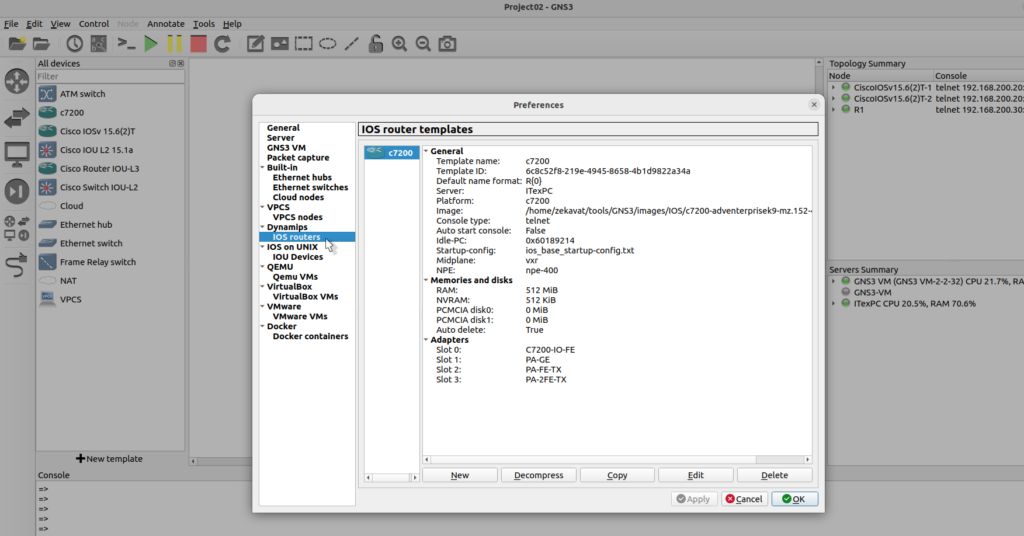
7200s have a different architecture. Only the 7206 is supported, it has 6 Port Adapters (PA) slots. VXR chassis, NPE-400 and C7200-IO-FE are the default settings in GNS3.
IOS 15 (Mainline); This router series is still getting new IOS 15.x versions. The last one at this date is: File name: c7200-adventerprisek9-mz.152-4.M8.bin Minimum RAM: 512MB
IOS 12.4.25g (Mainline) File name: c7200-a3jk9s-mz.124-25g.bin
IOS 12.4.24T5 (Technology train) File name: c7200-adventerprisek9-mz.124-24.T5
Cisco Catalyst Switches
Dynamips is incapable of running IOS images from Catalyst Switches, as it’s unable to emulate the ASICs used in those type of devices so ASIC based models like the Cisco Catalyst switches are impossible to import as a Routing and Switching image.
For switching, you can use an IOU L2 binary image, or an IOSvL2 virtual disk image with Qemu.
If you require more switching features, it is recommended to use larger Virtual Machine Switches and Routers (like the ones from VIRL) that run inside your choice of Qemu, Virtualbox or VMWare. For advanced switching IOSv and/or IOU is recommended.
Importing supported IOS image manually, IOS routers on Dynamips
For downloading Cisco images, you have to buy Cisco VIRL but the other vendors such as Cumulus or Arista allow to download their images without any cost.
In recent release of GNS3, provided to install devices by using the Import Appliance Wizard (File->Import Appliance) to automate the installation of image/VMs/Docker containers. We have cited this method before. However, we are going to discuss adding and configuring a supported IOS image manually.
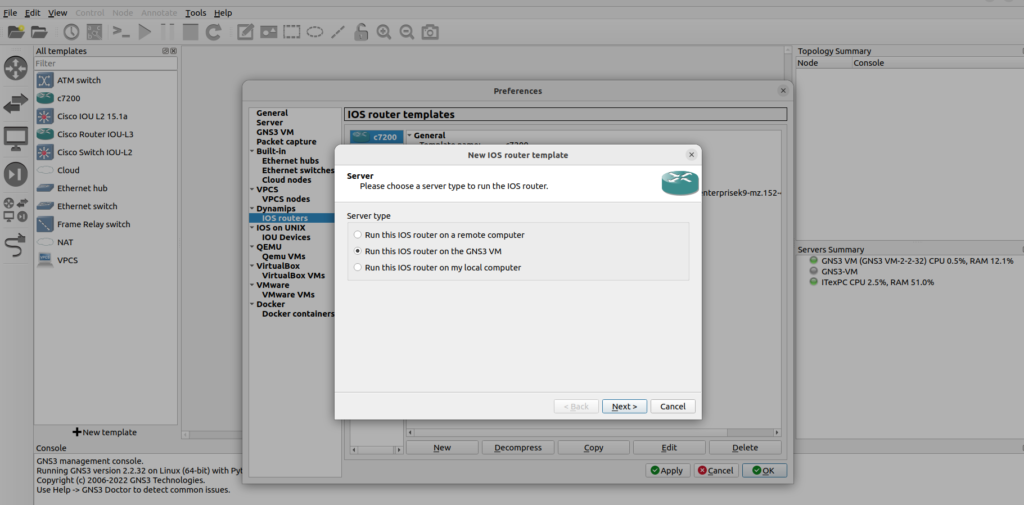
In the GNS3 GUI, click Edit > Preferences, to open the preferences menu. In the preferences menu, select ‘IOS Routers and New’, to begin the process of importing an image.
You’ll be prompted which server you’d like to run the image with, choose the option of ‘Run this IOS router on the GNS3 VM’
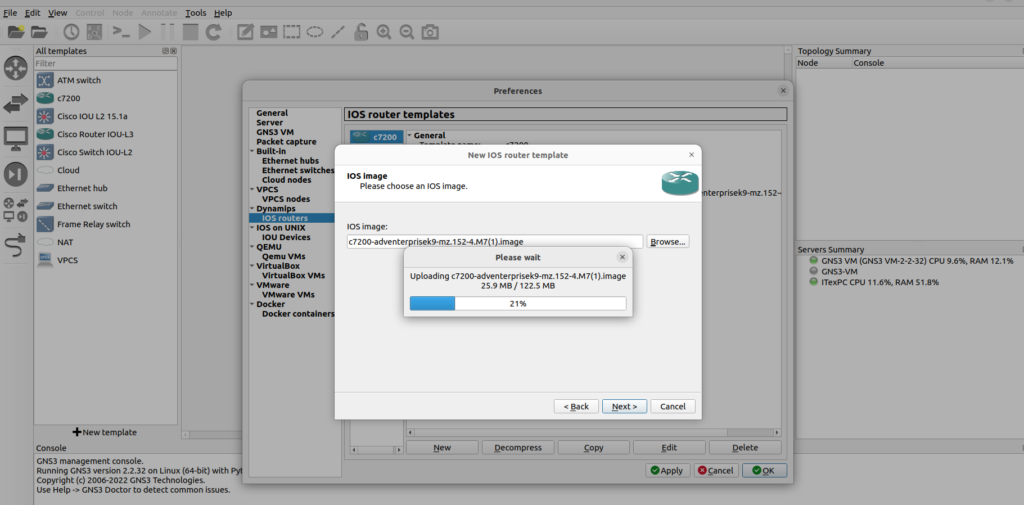
On the next screen, click ‘Browse’ to import a supported IOS image, browse to the folder where you have stored your Cisco IOS images, select the image, and click ‘Open’, then GNS3 are starting to decompress IOS images to allow for quicker booting of routers.
“Some vendors provide images of their systems for free. Others do not, and you are required to provide your own images. The GNS3 is unable to legally provide Cisco IOS images to anyone.”
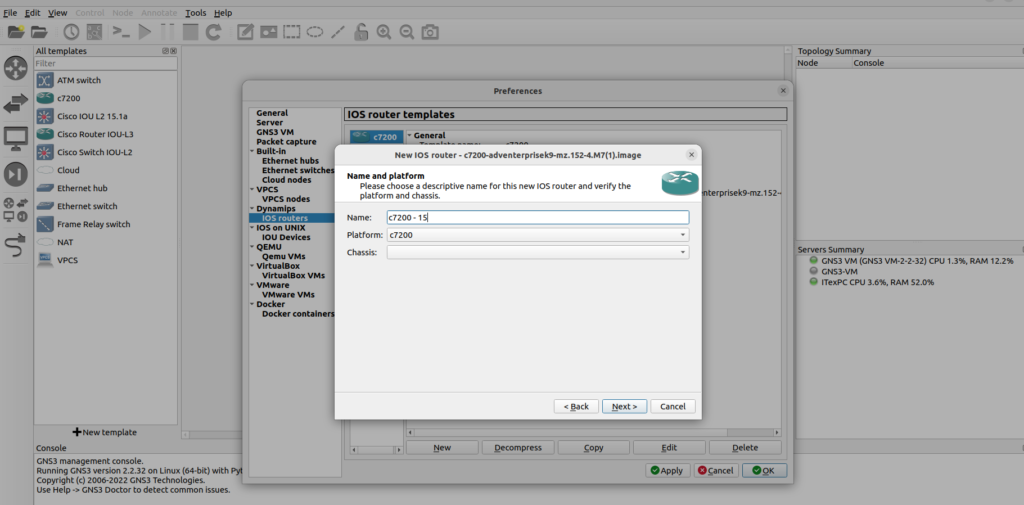
Next window displays options for naming the device and choosing platform, click ‘Next’
A Default RAM setting is displayed.
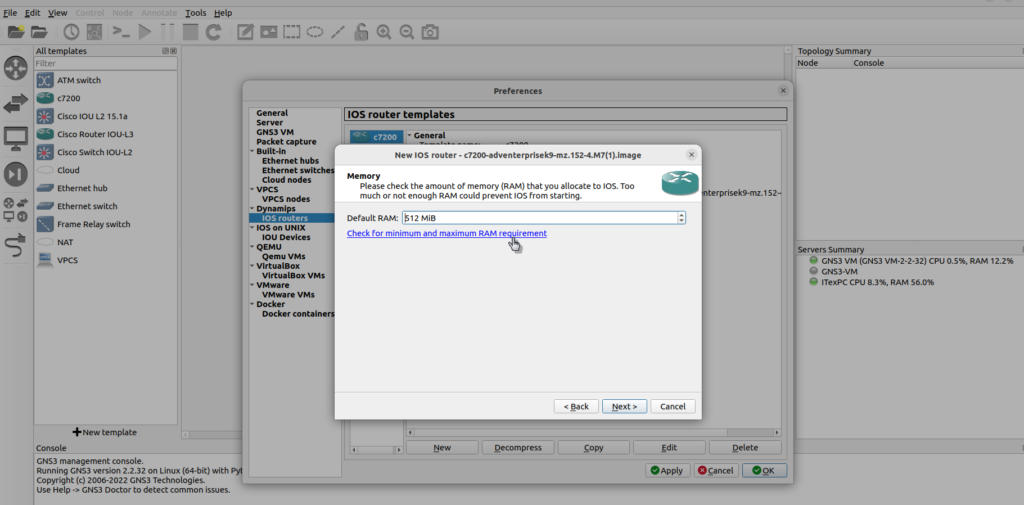
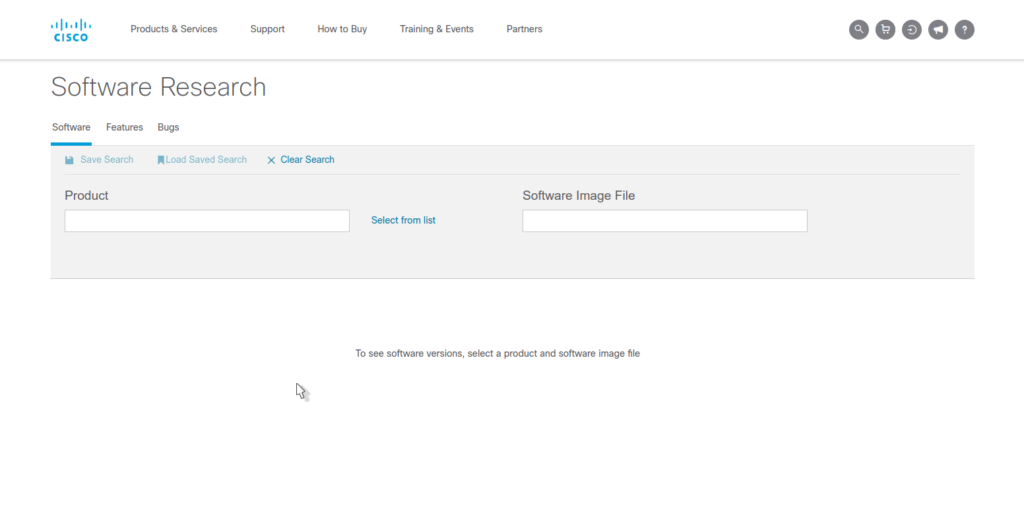
It is important that you check your Router’s minimum memory requirements using the Cisco website. Click the ‘Check for minimum and maximum RAM requirement’ option: Open the Cisco Software Research and enter the image name in the box of ‘software image file’ and check the minimum DRAM requirements for the IOS.
Set the Default RAM value to the value recommended by the Cisco Feature Navigator (yours may be different to the screenshot) and click ‘Next’,
Select your preferred Network adapters. This is device dependent. Once you have configured the network adapters, click ‘Next’ to add WIC adapters (again, this is IOS image dependent) When you have added WIC adapters (if available), click ‘Next,
It is important for optimum GNS3 performance that an Idle-PC value be selected. Occasionally, some images will already display an Idle-PC value, If a green Idle-PC value is NOT shown then click the ‘Idle-PC finder’ button to find an Idle-PC value
Click ‘Finish’ to complete
Importing supported IOS image manually, IOS routers on QEMU VMs
Let me add something here Browse routers and click ‘New template’, select ‘Install an appliance from the GNS3 server’
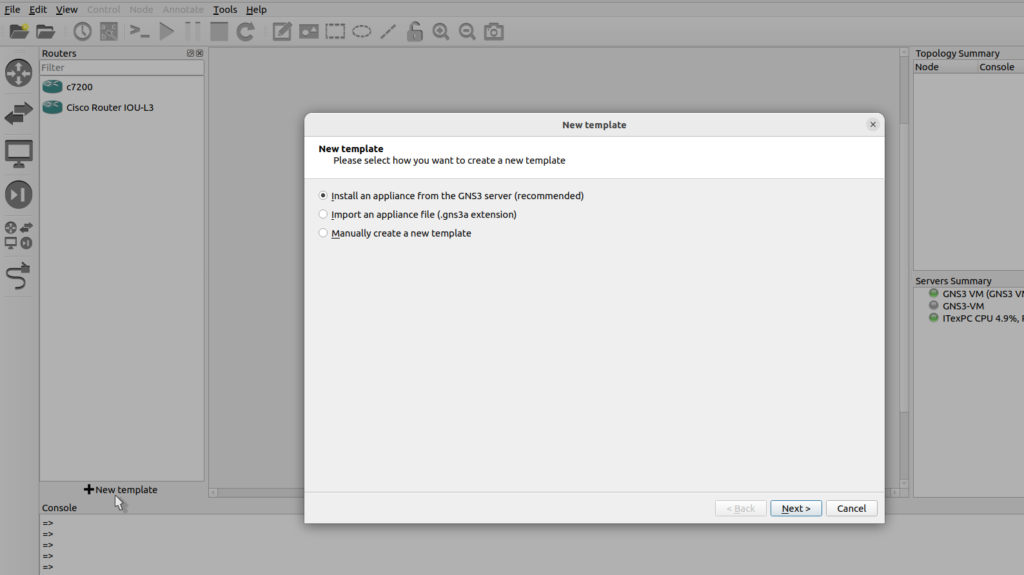
In this example I’m going to select routers Cisco IOSv, notice the emulator’s QEMU which means we want to run this on the GNS3 VM, then click install,
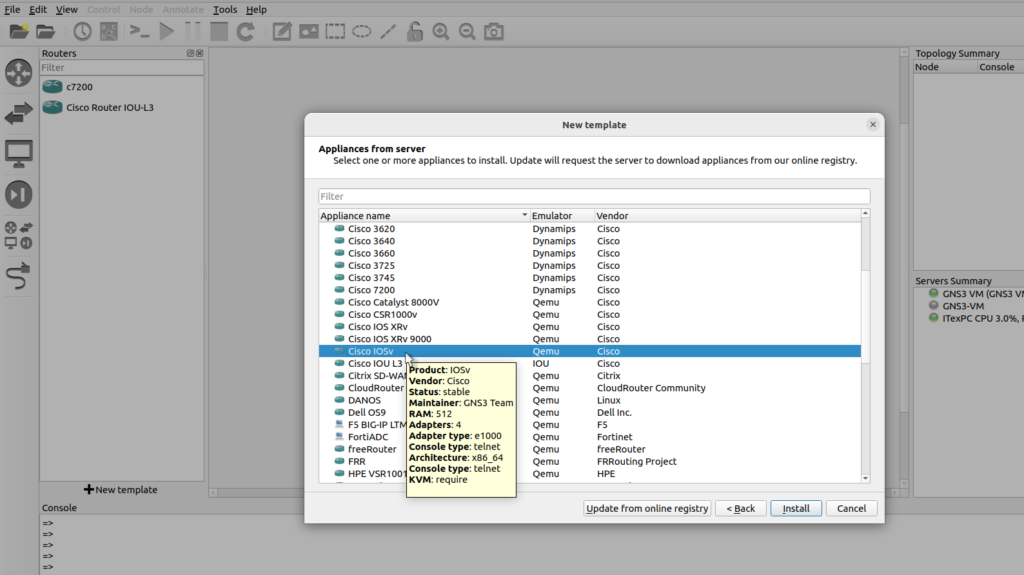
I want to install the appliance on the GNS3 VM as this is recommended,

QEMU settings I’m going to leave at the defaults and click next, GNS3 scans the local directory for files that required,
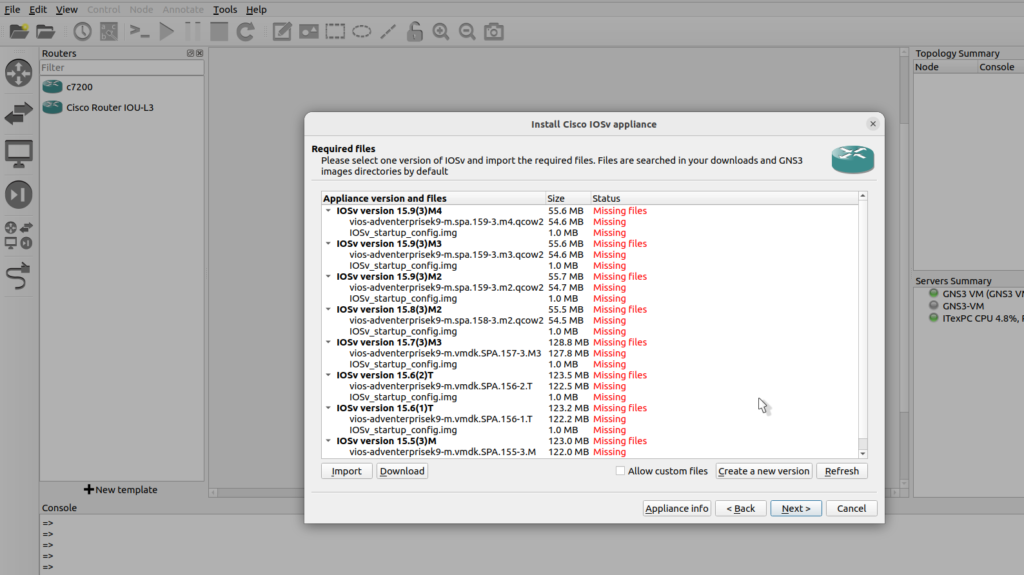
Select the version you download from Cisco website VIRL and click import
Previous
Next
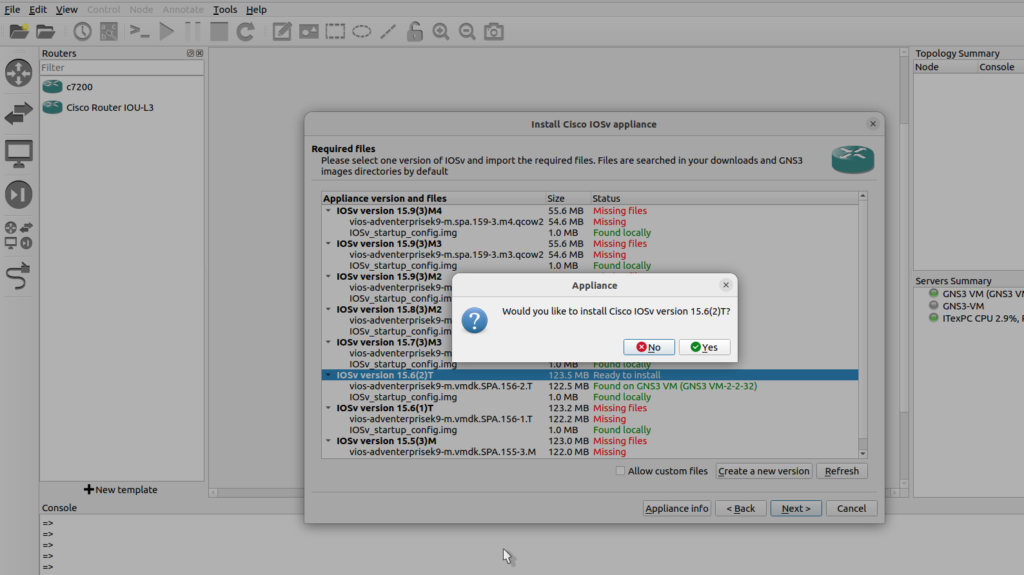
It doesn’t have the startup config file so I’m going to select that and click download to download the config file that takes me to Sourceforge.net. I saved the file to my local computer, back in GNS3, click refresh, the file has been found, I’ve got my operating system, so I can click next,
I am asked would I like to install IOSv, yes, the image is uploaded to the GNS3 VM, I’m also told that there’s no default password and enable password.
So IOSv has now been successfully installed, you could continuous the procedure of adding IOSvL2 similar this.
Previous
Next
GNS3 – Add Support for Docker (Optional)
By default, GNS3 allows you to use Docker containers when building networking labs. But first, you need docker engine installed and running so that you can create Docker Containers.
To install Docker CE (Xenial_and_newer)
Remove any old versions:
sudo apt remove docker docker-engine docker.io
Install the following packages:
sudo apt-get install apt-transport-https ca-certificates curl software-properties-common
Import the official Docker GPG key:
curl -fsSL https://download.docker.com/linux/ubuntu/gpg | sudo apt-key add –
Add the appropriate repo:
					sudo add-apt-repository
"deb [arch=amd64] https://download.docker.com/linux/ubuntu
   $(lsb_release -cs) stable"
Install Docker-CE:
					sudo apt update
sudo apt install docker-ce
Don’t forget to add your user to docker group
sudo usermod -a -G ubridge libvirt kvm wireshark docker $USER
Also, add your user to the following groups to avoid permission issues
sudo usermod -aG ubridge libvirt kvm wireshark $USER
Restart your user session by logging out and back in, or restarting the system.
How to remove GNS3 in a simple way
You could take advantage of Synaptic Package Manager in order to remover GNS3 from your personal computer, search GNS3 within Synaptic then do right-click and select ‘Mark for complete removal’
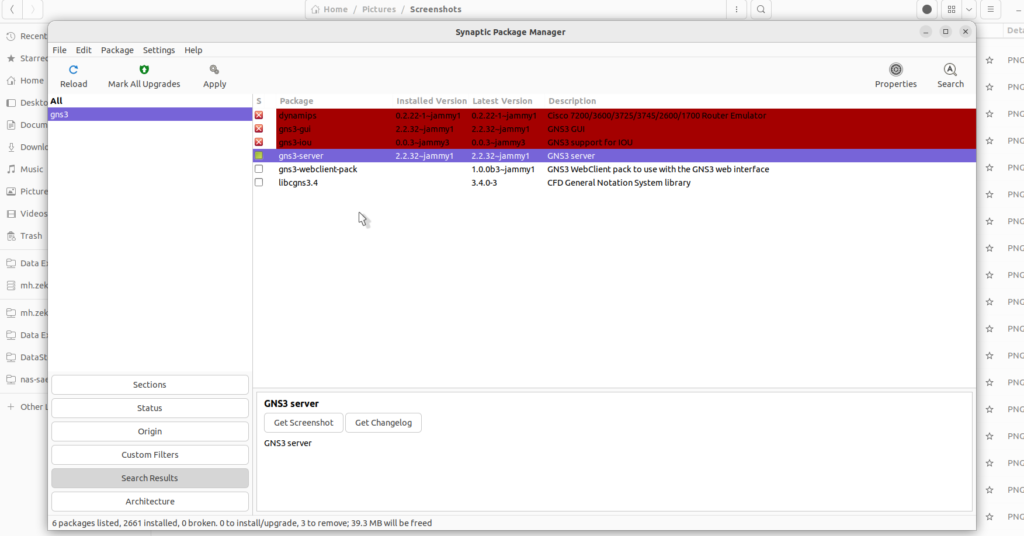
Once removal procedure is done, go to terminal and execute the below command in order to remove all related dependencies and packages,
Sudo apt autoremove
Congratulations! You are now ready to create your first GNS3 topologies.

Well done