
Static Routes
In this post we are going to focus on the concept of the static route configuration on the firewall. The first thing that comes to our minds, when we see the static routes is that somebody has to configure that static route. Static routes are manual labor we have to implement on the devices ourselves. So, on the firewall 1 we have a default static route that says 0.0.0.0/0.0.0.0. That default route in the routing table basely says, if “I don’t have” says firewall 1, a better match for the packet coming in as far as default routing, I’m going to use my default route as my last effort and forward packet to 23.1.2.1 which is the next hop address. Each router, firewall by firewall, is making this forwarding decision based on their own routing table.
[arm_restrict_content plan=”5,4,3,2,” type=”show”]
In addition to the static default route, we are going to let’s take a look at VPC-2 which imagine that has the 10.2.0.50 ip address. Firewall 1 receives a packet destined for 10.2.0.50. now from the routing perspective, firewall 1 does not have any specific route for 10.2.0.0. So, if we want add static route we have to say to firewall, if you need to send a packet 10.2.0.0/24 doesn’t matter what is the last octet is, go ahead and forward it to the next hop that in our topology is 10.123.0.72 on Port4 of firewall 2. Then one the packet sent there, the firewall 2 has the responsibility from the routing perspective to go ahead to the final destination.
[armelse]

[/arm_restrict_content]
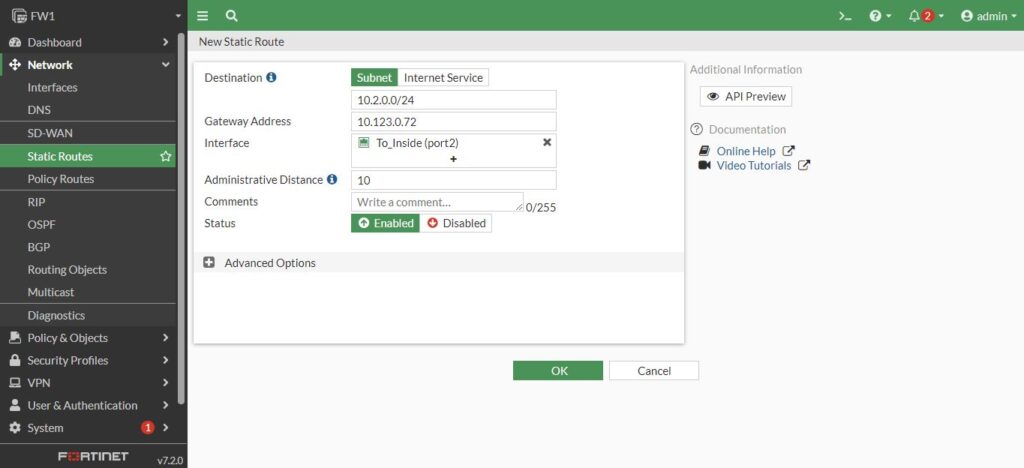
Now, come back to the Dashboard and then to Network and Expand the routing, here is our static routing:
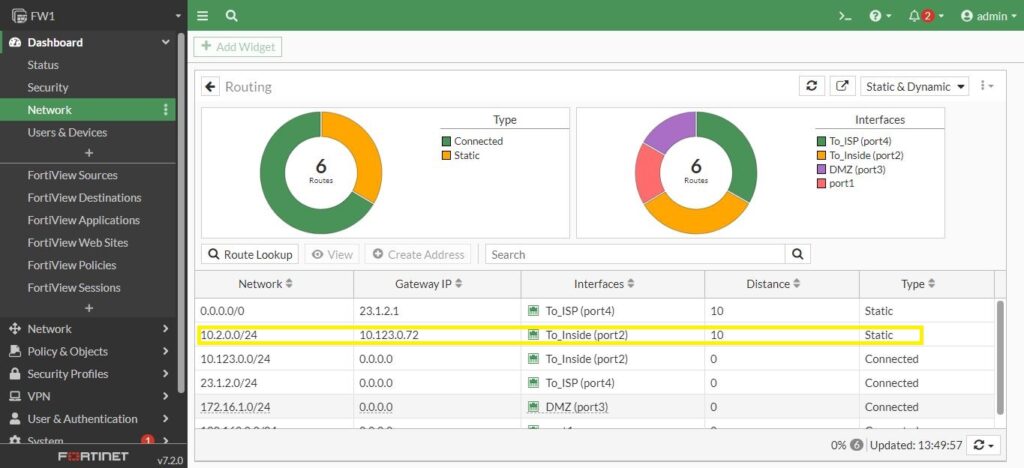
Static routes have to be correct and specify the next hop that actually will be able to forward it to on the final destination. Or toward another router or another firewall who can then forward it towards its final destination.
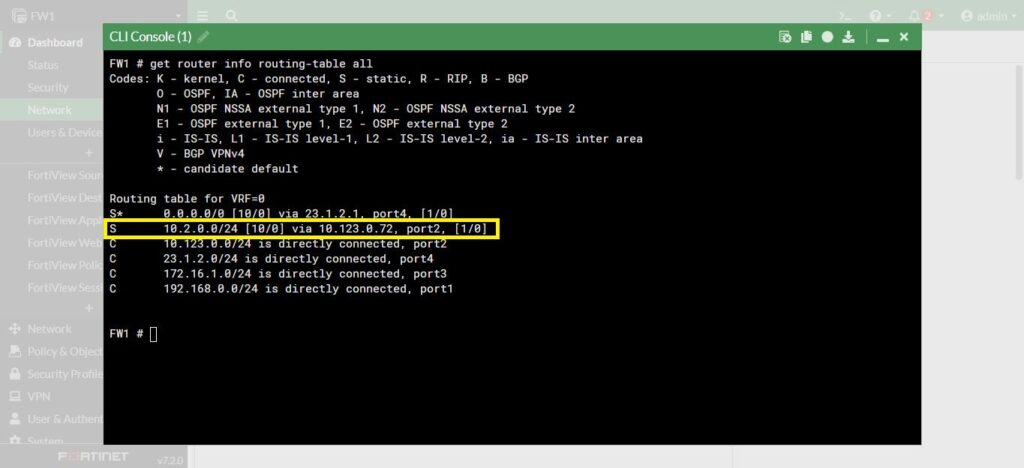
Back to the command line interface, and run the command “get router info routing-table all” we can see our static route as well:
If we want to verify which of these routes the firewall is going to use based on the destination ip address we can just test it right here at the CLI. So, we use the same command again and use details instead of all. Then asking for the specify an ip address. We can imagine we need forward a packet to 10.2.0.50. This is going to show us the specifically from the routing table which route this firewall is going to choose to make that forwarding decision.
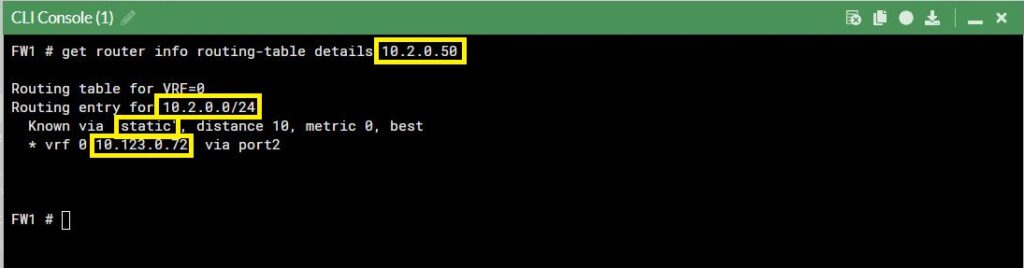
The firewall says, I’m going forward the packet to 10.2.0.50. I would use this entry route 10.2.0.0/24 that I learn via static and the next hop would be 10.123.0.72. My egress or outbound interface that is used to forward to the next hop is Port2.
If you have a static route from 4 different sources, with different Administrative Distance. The firewall will install the route with lowest AD. That is why the administrative distance comes in a play when you have two or more sources for the exact same route.
In the next post https://old.smenode.com/fortinet/fortigate-and-routing-information-protocol-rip/ we are going to talk about RIP dynamic routing protocol. We will demonstrate the configuration and verification on the fortigate.
