
Audiences: Candidates who want to prepare for CCIE Data Center (v3.0)
Scope: 1.1.b Tagging/Trunking from CCIE Data Center (v3.0) Exam Topics – Practical Exam
Virtual Local-Area Network (VLAN)
You can take a physical LAN switch which does not break the broadcast domain and logically break it into multiple broadcast domains. You are doing this by creating VLANs. A VLAN Identifier is a 12-bit number. You can also optionally give it a name. Since VLAN ID is a 12-bit number, you can have a value between 0 to 4095 (But you cannot configure all of them, more on this to come).
Here is the list of VLAN IDs you can configure on a switch:
- Standard VLANs (1-1005):
- VLAN 1 is the default VLAN for all the switchports. It is also default 802.1Q Native VLAN. Note that you cannot delete VLAN 1
- Extended VLANs (1006-3967):
- On NX-OS platforms, you can use these VLANs out of the box – as opposed to with Catalyst switches wherein you need to have VTP version 3 or VTP mode transparent.
- Internal:
- These VLANs are being used for internal applications.
N9K01# show vlan internal usage

VLANs                   DESCRIPTION
-------------------     -----------------
3968-4031               Multicast
4032-4035,4048-4059     Online Diagnostic
4036-4039,4060-4087     ERSPAN
4042                    Satellite
4045                    BUM VXLAN VLAN
3968-4095               Current
4041                    VXLAN Encap
4046                    VXLAN Decap
4047                    VXLAN DCI Decap
How to create VLANs and Break the Switch to Multiple Broadcast Domains?
You are breaking a switch to multiple broadcast domains, by assigning its ports to different VLANs (VLANs with the same VLAN IDs are part of the same broadcast domain). There is a terminology for assigning a switchport to a VLAN – that is Access Switchport. Here is how you can assign a switchport to a particular VLAN, but prior to that, we need to create the VLAN :
N9K01# configure terminal
N9K01(config)# vlan 100
N9K01(config-vlan)# name OPTIONAL
N9K01(config-vlan)# exit
Assign a switchport to VLAN 100 which was created above
N9K01(config)# interface ethernet 1/2
N9K01(config-if)# switchport mode access
N9K01(config-if)# switchport access vlan 100
Since we are frequently configuring access ports and since access ports are typically edge ports, we can leverage a command-line macro which is a shortcut to configure your access ports.
N9K01# configure terminal
N9K01(config)# interface ethernet 1/2
N9K01(config-if)# switchport host
configure terminal
interface Ethernet1/2
no channel-group
switchport mode access
spanning-tree port type edge
Edge port type (portfast) should only be enabled on ports connected to a single
 host. Connecting hubs, concentrators, switches, bridges, etc...  to this
 interface when edge port type (portfast) is enabled, can cause temporary bridging loops.
 Use with CAUTION

Edge Port Type (Portfast) has been configured on Ethernet1/2 but will only
 have effect when the interface is in a non-trunking mode.
N9K01(config-if)# switchport access vlan 100
Before we continue further, I want to introduce you to two handy commands on NX-OS switches. With global default interface ethernet x/y command, you can clear all the configuration of an Interface:
N9K01# configure terminal
N9K01(config)# default interface ethernet 1/2
Next, with global system default switchport, you can convert all the interfaces to Layer-2 interfaces. Then you can configure the Layer-3 interfaces when you need.
N9K01# configure terminal
N9K01(config)# system default switchport
IEEE 802.1Q Trunk
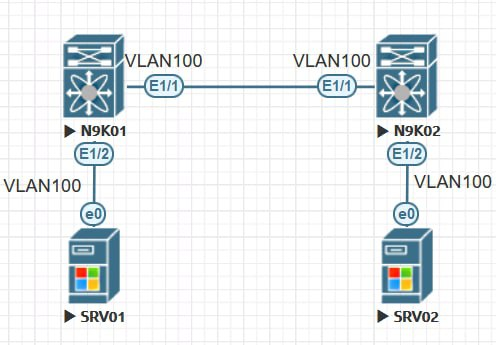
Up to now, we have logically broke a single physical switch down to multiple broadcast domains. Think that now we want to extend this broadcast domain to another switch. Hence, we need to configure the same VLANs on the second switch. Well, we have so far, configured the VLANs on both switches; next, we want to connect them together. One option is to extend each broadcast domain to the other switch by interconnecting each broadcast domain (meaning each VLAN) physically together. In another word, for VLAN A if you want to extend, you need at least one physical Ethernet cable to connect one of the switchports in VLAN A to one of the switchports in VLAN A on the other side. Do you see any problem with this? What if you have 20 VLANs on each switch?

What if we could tag each frame with a VLAN ID on one side, then pass the traffic to another side over a single link or an aggregation of some few links, then the other side could strip that tag? Luckily, we can tag the frames in the switches. The switchport which handles the tagged frames is called a trunk port. On Cisco NX-OS there is only one standard for tagging. That standard is IEEE 802.1Q. With IEEE 802.1Q, we add a 4-byte tag to the header of the frame.

Configure a Trunk Interface
To configure a trunk switchport, we simply need to issue command switchport mode trunk. By default, a trunk switchport will allow all VLANs across the Inter-switch link. however, you can restrict to a certain set of VLANs using switchport trunk allowed vlan followed by VLAN IDs (separated by ,) or range (separated by -)
N9K01# configure terminal
N9K01(config)# interface ethernet 1/1
N9K01(config-if)# switchport mode trunk
N9K01(config-if)# switchport trunk native vlan 100
N9K01(config-if)# switchport trunk allowed vlan 100,200
IEEE 802.1Q Native VLAN
On IEEE 802.1Q trunk, there is one Native VLAN whose frames are untagged by default. To avoid VLAN hopping attack (which is described here), we can:
- enforce the NX-OS to send the native VLANs tagged across the trunk link. OR
- prune the Native VLAN from the trunk.
Tag Native VLAN
N9K01# configure terminal
N9K01(config)# vlan dot1Q tag native
Prune Native VLAN
As mentioned earlier, you can also prune the native VLAN from the trunk. Here is how:
N9K01# configure terminal
N9K01(config)# interface ethernet 1/1
N9K01(config-if)# switchport trunk native vlan 999
N9K01(config-if)# switchport trunk allowed vlan remove 999Note: Although maintenance protocols such as CDP, PAgP, and DTP are normally carried over the native VLAN of a trunk, they will not be affected if the native VLAN is removed or manually pruned from the trunk. They still will be sent and received on the native VLAN.
Workshop
In this lab, we are going to configure the inter-switch link in different ways. First, (in LAB-01) we are going to access it to VLAN 100, then, (In LAB-02) we are going to configure that interface as a trunk port.
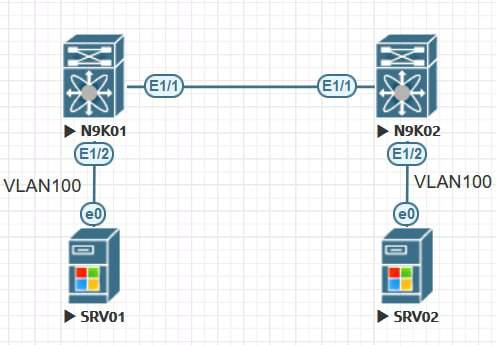
LAB-01
N9K1
vlan 100

interface Ethernet1/1
  switchport access vlan 100

interface Ethernet1/2
  switchport access vlan 100
  spanning-tree port type edge
N9K2
vlan 100

interface Ethernet1/1
  switchport access vlan 100

interface Ethernet1/2
  switchport access vlan 100
  spanning-tree port type edge
LAB-02
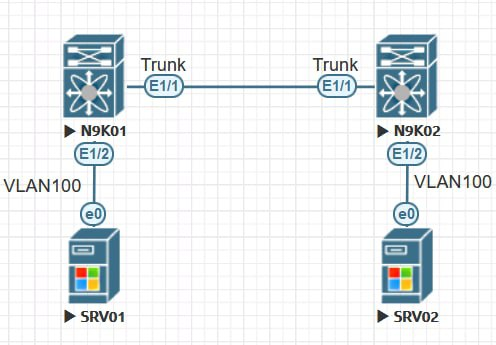
N9K1
vlan 100

interface Ethernet1/1
  switchport mode trunk
  switchport trunk allowed vlan 100

interface Ethernet1/2
  switchport access vlan 100
  spanning-tree port type edge
N9K2
vlan 100

interface Ethernet1/1
  switchport mode trunk
  switchport trunk allowed vlan 100

interface Ethernet1/2
  switchport access vlan 100
  spanning-tree port type edge
Resources
You can download EVE-NG setup from here:

Brilliant 👌👌
Well-written and easy to understand
Waiting for the next posts.